Thursday, 28 February 2013

Thirft Store Shopping

Anyone and everyone who knows me will tell you that I love Value Village.

And that is an understatement! 
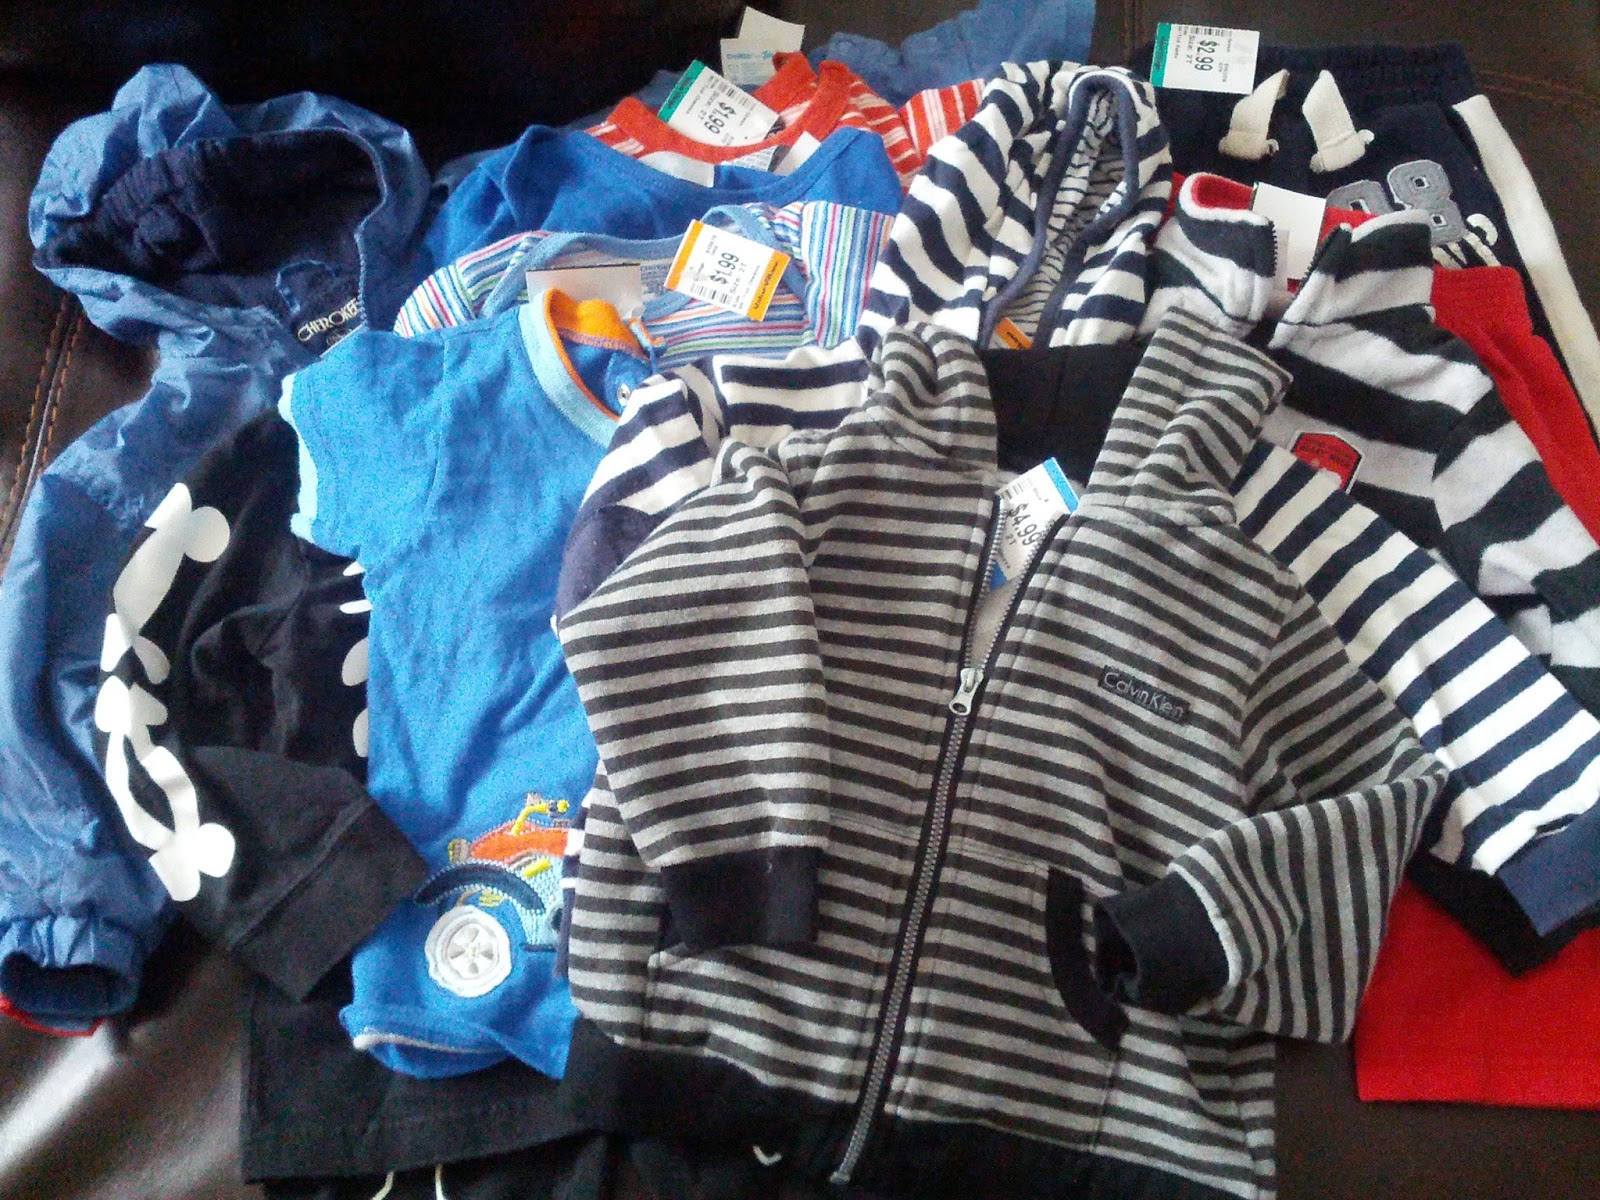
To be honest, I like all thrift stores, but Value Village is definitely my top pick! They recently had a 50% off sale and this past weekend was the pre-sale for members. So of course, I got the baby dressed, rounded up some friends and made my way to the store in search of decent baby clothes. What I found was better than decent! I found a Calvin Klein hoodie, for The Professor, for $2.50! Barely worn!
I paid $17 for all of this! I think I deserve a self high five for that!


There are a couple tricks to finding anything in a thrift store, so here are some based on my experience as a shopper and former Value Village employee...

First - you need to have the time. This may sound silly, but you really need to take the time to look through everything if there is something specific you are looking for. And when I say 'everything', I mean every related section. If you are looking for a shirt, look in ALL clothes sections! People pick up an item, change their minds, and just put it anywhere.

Next - you need to go often! They get their truck loads during the week only and the people who put the stuff on the floor also only work during the week. So, if you go on a weekend, be aware that you are looking through merchandise that was put out on Friday.

Then- Try everything on! Just because it says size 4 - doesn't mean it still fits like a size 4! Remember that almost everything you pick up will have been worn/washed so it could have changed shape. If you are lucky, you will find a brand new item of clothing with tags! 

Lastly - shop out of season when possible. People tend to donate seasonal items at the beginning of the season - however - items are cheaper out of season. Seasonal items are usually kept closest to the front of the store, so don't be afraid to dive in!

And of course - have fun! This is key for me! 
I don't tend to go to a mall because it's too commercialized/busy for my liking, and I hate having to go to many different places to find the things I want! And Abby loves Value Village for the endless possibilities and mystery of what treasures we might find! 

So there you have it! 

Reduce, reuse, upcycle and help me make a greener place for our children. :)


{Daily Odd Compliment: The say Disneyland is the happiest place on Earth. Which is weird because I didn't know being in your arms had a name.}

Thursday, 14 February 2013

Gnome Kisses

We made some pretty adorable gnomes for Abby's class for Valentine's Day!

Valentine's Day has never really been my thing, but it occurred to me last year, (after Abby brought home many Valentine's Day cards) that maybe it's a bigger deal to kids. 
So this year, I'm going big
I think cards are a waste of money, so I decided to get creative and I found the perfect inspiration!
I fell in love with these gnomes as soon as I saw them! 
So here is our take on them.. 


Since I don't like felt, I used old file folders to make the hats. 
(I use these a lot because we go through them like candy at work, so it makes a great free material for our crafts! And recycling is just a bonus!)
Mel drew circles and Abby cut them out. She was a great helper!


I happened to find some colorful googly eyes at the dollarstore! I also picked up some boring ones, but I couldn't leave these ones!


See what I mean?

So I glued those first, with the hot glue gun, to the kisses. Once our circles were cut out, we cut them in four equal parts, to make little triangles, then I glued those to the top of the kisses.
They were almost done, but I needed somewhere to write the kids' names, so that's why they have beards! And on the bottom of the beards, I added my signature. 


And you are never too old to look your very best while crafting!


I think they turned out pretty good! I think they might look better in felt, but I prefer using recyclable supplies than having to buy more. 


Down with commercialism - Upcycle all the way! 

(If you are reading this because your child got one of these - welcome! And thank you for checking out my blog(s)!)


{Daily Odd Compliment: I was going to get you chocolate for Valentine's day, but then I was like, "An otter feeding you the chocolate would be so much better." Because they're cute, and you're cute, so it makes sense. But I didn't do that because otters seem hard to train, and they're probably expensive.}

Saturday, 12 January 2013

Girls Craft Night Saga

I have been having more and more girls night/craft night, but it's never enough!

This past Saturday, I had an awesome girls crafting night! I am trying to get as many of my friends as possible to do crafting with me cause I LOOOOVE it! 
Seriously - it was awesome to not have to worry about my kids (they were with Grandma and Grandpa) and have some wine and just craft! 
Also, I love when my living room looks like this...

Here are some of the awesome crafty things that went down...

Mel made an awesome collage, using something I found and have no idea what it's for...
So it got re-purposed as a pretty tray!

Angela did a bunch of stuff with pictures of her son and some of his artwork. 
Kids have way too much artwork, so kudos to her for framing it!

Amy painted a really cute monkey for her son!

Lindsay re-purposed a metal tray into a makeup holder by adding fabric to the tray, and magnets to her makeup. 

My sister, Vanessa, made a really awesome crayon art
She glued a bunch of crayons to a 2x4...
And then used the hairdryer to make them melt onto the canvas, while Mel held the cardboard over the silhouette that Vanessa painted on the canvas.

And finally, I also mangaged to make a few things.. in between cooking all the delicious appetizers we had for dinner...
 I made this shadow box for Mel. It contains a rose and peacock feather from my bouquet as her M.O.H, as well as a few buttons. I used scrapbook paper to cover the front of it. 
Then, I made a notebook for Jay out of old disquettes. 
(I used sticker letters to write his name on the front.)

This concludes an addition of Girls Craft Night. 
Stay tuned.. there will be many many more!

{Daily Odd compliment: When I first saw you, I pictured our lives together. Is that weird? That's not weird. You're weird. And I like it.}

Saturday, 29 December 2012

The Season of Giving

I hate posting this after Christmas, but I really had to since I wanted everything to be a surprise! 

So here are a few DIY gifts that I made this year...

I started with a scarf for my daycare provider, because it was the most simple. I made almost 20 of these suckers for my baby shower (but none since) and I was still pretty confident that I would be able to replicate an awesome scarf. 
Success! I had a couple bumps in the beginning, but all in all, I remembered how to fix my mistakes, so it worked out well! I also taught myself how to sew a 'P' onto a knitted piece. It didn't turn out as awesome as I would have liked, but it's still a pretty neat effect! 


Next, it was my cousin's girlfriend's gift. 
I don't know her very well, but I do know that she just had a baby and appears to love pink as much as I do, so that seemed easy enough! 
I found an awesome mug and drew my inspiration from there. I bought 3 different sized bowls, and 2 plates from Dollarama and beautified them with some Sharpies. 
There are now a bunch of different people who have posted about this and I can't find my original inspiration, but this is so easy to do! 
(Just a side note, you should use real Sharpies because I didn't, and the colors changed! Boo! One of the bowls didn't turn out at all, so I kept it!) 
But once you draw (or have your kids draw) on the dishes, stick them in the oven at 350 for about 30 minutes. Done! 
I used masking tape to section off the black lines and it worked pretty well! 
This gift fits all my favorite parts about giving a gift - personalized, easy, fast, and inexpensive! 
She thought this was the greatest thing ever! 
Phew!

My next gift, was for my cousin Emma, and I found it on Christy's blog
It's a marshmallow shooter! 
Jay got and cut all the PVC pieces and we printed the instructions 
and put it in a box. 
We had to substitute the marshmallows for wheat puffs, since the marshmallows got stuck (maybe our fancy Canadian marshmallows are bigger?).

And, I couldn't resist making this braided ball for my cousin's newborn. 
It was actually pretty easy to make. I used my knitting machine to knit the 6 strands, then braided it all together. I tried to follow the Ravelry pattern, but I found it too complicated to convert the paper strands to knit strands, so I eyeballed it. I added a baby rattle in the middle to make it a little more fun. 
I can't wait to hear updates as she grows!

All in all, it was a successful DIY Christmas! 

{Daily Odd Compliment: I like you more than I like receiving gifts. And I absolutely love getting presents. It's probably my favorite thing to do}


Tuesday, 4 December 2012

D.I.Y Advent Jar

This year, 
I am omitting a chocolate advent calendar from my list.

Seriously, that's not what the holidays are about! I love spending time with my family, but I feel that more and more, commercialism is trying to take over the world and I am fighting more and more to keep it out of my house... in case you haven't noticed from my last couple of posts. 

Moving on... After Googling and Pinteresting advent calendars, I came up with a good alternative to a candy filled calendar - an advent Jar! 
I found what appears to be an old coffee jar (courtesy of an old tenant/friend) in my basement, so I used it.

First, I used my trusty mod podge to glue some holiday themed wrapping paper to the lid.

Next, I cut out some of the circular pieces and glued them randomly to one side, and cut out triangles to create a tree, on the other side.


Then, once the lid was dry, I cut the excess paper off the lid.

To finish off the jar, I hot glued a snowman ornament, that Abby made one year on her birthday, to the top.

Then, I added all the pieces of paper, each with a different activity on them.
I made some pink, for activities that can be done during the week, and some yellow, for activities that need more time and can be done on a weekend.

I know we are already a few days into December, but Abby hasn't even asked yet about a chocolate calendar, so I am pretty excited about starting this tomorrow!
Now, all we need is snow!


{Daily Odd Compliment: I miss you as much as I miss my childhood. Only, a little less than that.}

Sunday, 2 December 2012

D.I.Y / Second hand Birthday Party

My baby girl has turned 6 and my Professor is almost a year old. Whoa.

It was a challenging to think of a good party that could involve both of the kids and be fun, as well as age appropriate, for both age groups. Oh, and it had to be inexpensive! My house is barely big enough to hold my own family, so I decided to do it at our community centre. They have a lot of awesome rooms to rent, but the one I picked, is one that is used for playgroups and has a few couches.

For the cake, I knew I didn't want to do two separate cakes, so I decided to do some mini cupcakes, and cupcakes inside ice cream cones (I don't think I need to tell you that I got the idea from Pinterest, but I will anyway!).
These are really cute, tasty and best of all - really easy to make! Honestly! 
I poured the batter directly into the ice cream cone, about half full, then placed them in a muffin tin, and baked them exactly like I would bake other cupcakes.
I also made Abby a personalized cookie...
...and just an X for the Professor.
And of course, I couldn't let the birthday boy go without a mini cupcake! 
I'm pretty sure he liked it!

It was very important to me to have most of the birthday items be second hand, so I brought as many craft things from my stash as possible... 
I used old colorful file folders that I have laying around for people to cut out... 
I also found some crafts from Abby's 3rd birthday so I thought this was the perfect opportunity to break those babies out. Mel brought some awesome temporary tattoos that you can color in, and the kids (big and small) really enjoyed them!
Needless to say, the craft table was quite a hit! 

After browsing Pinterest for many hours, looking for birthday ideas, I came across a variety of things to do with balloons and/pictures. I knew I wanted to do something fun with some old birthday pictures, more than I wanted to incorporate balloons, so a friend and I braided some yarn, then I taped the braids between 2 pictures. 
Each picture was actually doubled sided, since I wasn't sure where they would hang and I thought it would be a neat effect that way. 
We ended up hanging them from the posts in the room.
The pictures are in order of Abby's birthdays, with the last one being The Professor. 
I think this is just the beginning for me of incorporating pictures like this into a 
birthday party! 

The gifts were awesome! Abby was thrilled with the amount of Barbie related things she got! I was pretty impressed at the Professor's ability to unwrap gifts! 
Tada!

Instead of loot bags for the kids, I decided to get each of the kids a second hand puzzle or game. My idea was for them to potentially play with them during the party, but they were having too much fun! But they all got to take one home to play with, so I think that's a win!

All in all, it was quite a success and I would recommend renting a space like this to any family who doesn't want the chaos that comes with having a 
child's birthday party in your home! 
I can hardly believe that a year ago I was at my wit's end with my pregnancy, and now I almost have a toddler..

The first year is bittersweet, but I do love birthday parties!


{Daily Odd Compliment: From now on, all my birthday wishes will be about you}


Saturday, 1 December 2012

Made with Love

I couldn't decide if I should include Abby's present in with the birthday post, but I thought keeping them separate would be more fun, and I want to highlight Abby, just as I did with 
The Professor...

As a homemade gift for Abby, as I explained in my post about The Professor's present, I tried to come up with something that would be both neat, and fun for her. So, I came up with the idea of turning some of her clothes into doll clothes. I sort of went off the tracks from my original idea, but ended up with a good result anyway, so I count it as a win! 

I started off with a skirt of her's that was too small. 
(It had built in shorts, so I removed them.)
Then, I cut both sides of the skirt to remove some bulkiness and width. After I eyeballed it, I measured it against the doll and sewed it at the right width. 
Done. 
(And of course, I made her a cute little vest because I just couldn't resist!)

Then, (and this is where I went off course), I took a skirt of mine that I didn't really like, and made a skirt for Abby, and a halter dress for her doll. 
This is my skirt, which I took apart, including the elastic, and Abby's skirt.
And this is Abby's skirt with the doll's dress. 
This one was a little more complicated, but it turned out pretty cool. It's a little too tight, so I may have to make a few adjustments, but she liked it, so that's all that matters to me!

Next year, I will have to get a little fancier! 


{Daily Odd Compliment: Compared to what I would do for you, The Legend of Zelda is just child's play}