Showing posts with label DIY. Show all posts

Tuesday, 10 January 2017

The Rustle of the Leaves

The wind of change are blowing. Again.


This one, however, was not actually prompted by me. I have had to put a temporary hold on Travelling Tails, while I move to a smaller place. Hopefully, it's just for a few months, but who knows!

So, in light of my diminishing living spaces (and to distract me from the sadness of no longer hosting), I have been focusing my attention to finding ways to storing stuff more efficiently and practically.

I tried to make a cat hammock (this inspired me), but I failed - miserably! I had the idea to use metal hangers, since they suck for actual clothes (and were left by one of the previous roommates), and of course, I hate getting rid of stuff if I can use it! I did, however, find a way to make toilet paper storage look cute!

Let me tell you - packing up/organising a house while it is being renovated, having 2 December birthdays, AND having Christmas be around the corner - is a lot more challenging than I would have thought! It's basically a mad dash to get stuff into a box before it gets caked in dust, or accidentally wrapped! I was dusting off and cleaning everything before it got packed away - which I guess is good - but it also felt like triple the effort!


Once all my stuff made it into a box (or the back of the van), it was nice to be in my own space. I already miss the potential of hosting guests, but I am always open to friends coming to stay! (hint hint!) 

Now that some dust has settled, I am putting my energy into maximizing the oddly shaped closets and shelves (which are all crooked and teeny!) So if you have any DIYs or miracle space saving tips - send 'em my way!

Stayed tuned for Travelling Tails' next move!

{Daily Odd Compliment: If you're reading this, you have nice legs. And can read. Congrats on both, friend.}

Sunday, 29 September 2013

The Wall Unit

This wall unit has been idolised in Jay's family for many years.
There's not much about it, really. It's a long bookcase that's from the 70s. 
It's dark brown, with many spindles and shelves, so it's actually made to last.
Both Jay and his sister have been debating over who holds the adoption rights of this shelving unit.

Until now.

Their grandmother's friend was getting rid of her unit that was pressumed to be the same as the original shelving unit in question.
So, I went to see Grandma and picked it up, just in case.
I was very delighted when I saw it in person because I knew it was the unit.
I brought it home and immediately put it together in The Professor's room.

I thought that there should be baskets or boxes to hold the smaller things, and the things that are on their way out, either to a friend or Value Village.

So I started with an old drawer that I have kept for many years.
Ok - it was given to me in college by an ex-roommate because the drawer unit was broken, but I haven't been able to part with this pink drawer! I'm sure she will get a good laugh at seeing this!

I used an old baby blanket that was given to me second hand, so it's not particularly sentimental to me, and works really well in the jungle themed room. 
I layed it out and started hot gluing it in place, then cut the excess.
I was very lucky that The Professor was entertained throughout the hot gluing process!


This one is for toys with wheels (roues) and since Xavier can reach it, he just takes out the cars he wants and the box stays on the shelf! 

I made another one, using a diaper box, but of course as soon as it was seen, there was a marker taken to it. 
It's nothing that the wall can't hide though!

I also covered a bigger diaper box with an old Winnie The Pooh sheet, to use for donations. I was inspired by Amy's idea, and while I don't have the need for many boxes, I do have a need for somewhere to coral stuff that I want to get rid of. 

So that's it! 
I managed to empty a large toy chest because of organization and getting rid of an entire box of clothes and toys! 
Yay purging! 

{Daily Odd Compliment: daily odd compliment: If I had to pick between being friends with you or being friends with Sir Patrick Stewart, I would pick Patrick Stewart. But I'd talk about you all the time.}

Thursday, 8 August 2013

DIY Nails and Yarn Card Holder

The change table is gone. 

It was time. 


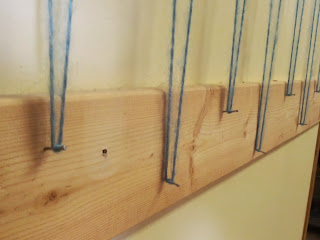
When we took down the change table (above), we were left with the 1x4's and a big space. I debated what to do with that space for a couple of weeks when today,
 it dawned on me - nails and yarn! 

It's the perfect custom piece that is functional, compact, easy to do, and fun to look at! 

I put in my first nail, then I used a random nail file (different nails but equally useful) to measure the distance between 2 nails. I marked it at the end of the file with a pencil, then moved it to the mark and did the same thing, for the rest of the board. I used 7/8" finishing nails so they are only in the board, not the wall.
Then I tied some yarn to the top left and circled all the nails. I wrapped the yarn a couple times around the nail to keep the tension. Then I hit hammered the nails in a little more, so they aren't going to hurt anybody. 


See?

It was simple, quick and pretty! I call that another DIY win!

{Daily Odd Compliment: Sometimes when I see you, I want to run and hug you. But I don't do that, because it actually happens all the time, and I don't want to run that much.}

Saturday, 16 March 2013

Upcycling is Priceless : DIY Fabric Bracelet

Is there anything better than turning something old into something new - for free?!

I made myself this braided bracelet (try saying that 5 times in a row quickly) to match a dress I am in the process of making.

I bought the cute clip with a bow at my latest Value Village trip and it cost me a whopping $1 for an entire bag of these suckers! And there must be at least 50 of them in the bag!

I used the seams of the scrap pieces of material from my husband's shirt that was destroyed in the great dog attack of 2013. 

Once I get my sewing machine in running order, the dress will be done in no time! I'm keeping all the scrapes so I can make other accessories! 

Reduce, upcycle and make your children be the models for your latest creation because they don't have hairy arms!

{Daily Odd Compliment: You have one of the brightest minds I've ever known. It's as if the sun looked at da Vinci and was like, 'Sup, playa?' And then da Vinci was all, 'You wanna do this?' And then they created your mind.}

Saturday, 29 December 2012

The Season of Giving

I hate posting this after Christmas, but I really had to since I wanted everything to be a surprise! 

So here are a few DIY gifts that I made this year...

I started with a scarf for my daycare provider, because it was the most simple. I made almost 20 of these suckers for my baby shower (but none since) and I was still pretty confident that I would be able to replicate an awesome scarf. 
Success! I had a couple bumps in the beginning, but all in all, I remembered how to fix my mistakes, so it worked out well! I also taught myself how to sew a 'P' onto a knitted piece. It didn't turn out as awesome as I would have liked, but it's still a pretty neat effect! 


Next, it was my cousin's girlfriend's gift. 
I don't know her very well, but I do know that she just had a baby and appears to love pink as much as I do, so that seemed easy enough! 
I found an awesome mug and drew my inspiration from there. I bought 3 different sized bowls, and 2 plates from Dollarama and beautified them with some Sharpies. 
There are now a bunch of different people who have posted about this and I can't find my original inspiration, but this is so easy to do! 
(Just a side note, you should use real Sharpies because I didn't, and the colors changed! Boo! One of the bowls didn't turn out at all, so I kept it!) 
But once you draw (or have your kids draw) on the dishes, stick them in the oven at 350 for about 30 minutes. Done! 
I used masking tape to section off the black lines and it worked pretty well! 
This gift fits all my favorite parts about giving a gift - personalized, easy, fast, and inexpensive! 
She thought this was the greatest thing ever! 
Phew!

My next gift, was for my cousin Emma, and I found it on Christy's blog
It's a marshmallow shooter! 
Jay got and cut all the PVC pieces and we printed the instructions 
and put it in a box. 
We had to substitute the marshmallows for wheat puffs, since the marshmallows got stuck (maybe our fancy Canadian marshmallows are bigger?).

And, I couldn't resist making this braided ball for my cousin's newborn. 
It was actually pretty easy to make. I used my knitting machine to knit the 6 strands, then braided it all together. I tried to follow the Ravelry pattern, but I found it too complicated to convert the paper strands to knit strands, so I eyeballed it. I added a baby rattle in the middle to make it a little more fun. 
I can't wait to hear updates as she grows!

All in all, it was a successful DIY Christmas! 

{Daily Odd Compliment: I like you more than I like receiving gifts. And I absolutely love getting presents. It's probably my favorite thing to do}


Tuesday, 4 December 2012

D.I.Y Advent Jar

This year, 
I am omitting a chocolate advent calendar from my list.

Seriously, that's not what the holidays are about! I love spending time with my family, but I feel that more and more, commercialism is trying to take over the world and I am fighting more and more to keep it out of my house... in case you haven't noticed from my last couple of posts. 

Moving on... After Googling and Pinteresting advent calendars, I came up with a good alternative to a candy filled calendar - an advent Jar! 
I found what appears to be an old coffee jar (courtesy of an old tenant/friend) in my basement, so I used it.

First, I used my trusty mod podge to glue some holiday themed wrapping paper to the lid.

Next, I cut out some of the circular pieces and glued them randomly to one side, and cut out triangles to create a tree, on the other side.


Then, once the lid was dry, I cut the excess paper off the lid.

To finish off the jar, I hot glued a snowman ornament, that Abby made one year on her birthday, to the top.

Then, I added all the pieces of paper, each with a different activity on them.
I made some pink, for activities that can be done during the week, and some yellow, for activities that need more time and can be done on a weekend.

I know we are already a few days into December, but Abby hasn't even asked yet about a chocolate calendar, so I am pretty excited about starting this tomorrow!
Now, all we need is snow!


{Daily Odd Compliment: I miss you as much as I miss my childhood. Only, a little less than that.}

Sunday, 2 December 2012

D.I.Y / Second hand Birthday Party

My baby girl has turned 6 and my Professor is almost a year old. Whoa.

It was a challenging to think of a good party that could involve both of the kids and be fun, as well as age appropriate, for both age groups. Oh, and it had to be inexpensive! My house is barely big enough to hold my own family, so I decided to do it at our community centre. They have a lot of awesome rooms to rent, but the one I picked, is one that is used for playgroups and has a few couches.

For the cake, I knew I didn't want to do two separate cakes, so I decided to do some mini cupcakes, and cupcakes inside ice cream cones (I don't think I need to tell you that I got the idea from Pinterest, but I will anyway!).
These are really cute, tasty and best of all - really easy to make! Honestly! 
I poured the batter directly into the ice cream cone, about half full, then placed them in a muffin tin, and baked them exactly like I would bake other cupcakes.
I also made Abby a personalized cookie...
...and just an X for the Professor.
And of course, I couldn't let the birthday boy go without a mini cupcake! 
I'm pretty sure he liked it!

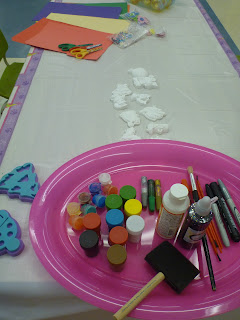
It was very important to me to have most of the birthday items be second hand, so I brought as many craft things from my stash as possible... 
I used old colorful file folders that I have laying around for people to cut out... 
I also found some crafts from Abby's 3rd birthday so I thought this was the perfect opportunity to break those babies out. Mel brought some awesome temporary tattoos that you can color in, and the kids (big and small) really enjoyed them!
Needless to say, the craft table was quite a hit! 

After browsing Pinterest for many hours, looking for birthday ideas, I came across a variety of things to do with balloons and/pictures. I knew I wanted to do something fun with some old birthday pictures, more than I wanted to incorporate balloons, so a friend and I braided some yarn, then I taped the braids between 2 pictures. 
Each picture was actually doubled sided, since I wasn't sure where they would hang and I thought it would be a neat effect that way. 
We ended up hanging them from the posts in the room.
The pictures are in order of Abby's birthdays, with the last one being The Professor. 
I think this is just the beginning for me of incorporating pictures like this into a 
birthday party! 

The gifts were awesome! Abby was thrilled with the amount of Barbie related things she got! I was pretty impressed at the Professor's ability to unwrap gifts! 
Tada!

Instead of loot bags for the kids, I decided to get each of the kids a second hand puzzle or game. My idea was for them to potentially play with them during the party, but they were having too much fun! But they all got to take one home to play with, so I think that's a win!

All in all, it was quite a success and I would recommend renting a space like this to any family who doesn't want the chaos that comes with having a 
child's birthday party in your home! 
I can hardly believe that a year ago I was at my wit's end with my pregnancy, and now I almost have a toddler..

The first year is bittersweet, but I do love birthday parties!


{Daily Odd Compliment: From now on, all my birthday wishes will be about you}


Saturday, 1 December 2012

Made with Love

I couldn't decide if I should include Abby's present in with the birthday post, but I thought keeping them separate would be more fun, and I want to highlight Abby, just as I did with 
The Professor...

As a homemade gift for Abby, as I explained in my post about The Professor's present, I tried to come up with something that would be both neat, and fun for her. So, I came up with the idea of turning some of her clothes into doll clothes. I sort of went off the tracks from my original idea, but ended up with a good result anyway, so I count it as a win! 

I started off with a skirt of her's that was too small. 
(It had built in shorts, so I removed them.)
Then, I cut both sides of the skirt to remove some bulkiness and width. After I eyeballed it, I measured it against the doll and sewed it at the right width. 
Done. 
(And of course, I made her a cute little vest because I just couldn't resist!)

Then, (and this is where I went off course), I took a skirt of mine that I didn't really like, and made a skirt for Abby, and a halter dress for her doll. 
This is my skirt, which I took apart, including the elastic, and Abby's skirt.
And this is Abby's skirt with the doll's dress. 
This one was a little more complicated, but it turned out pretty cool. It's a little too tight, so I may have to make a few adjustments, but she liked it, so that's all that matters to me!

Next year, I will have to get a little fancier! 


{Daily Odd Compliment: Compared to what I would do for you, The Legend of Zelda is just child's play}

Monday, 17 September 2012

DIY Bridal Shower

This is my first time being a Maid of Honor, and definitely my first time organising a bridal shower! 
I tried to make as much as possible, to make it both affordable and personalised...

I started off with a theme... that was the easy part!
 Organising!
I asked all guests to keep that in mind when thinking of a gift.
I bought a few containers, and reused a few I already had, as Mel's gifts.
I had a wonderful vision of the sun shinning on the rooftop... red and purple balloons floating around... and the best cake ever...

I was pretty close! The sun shone for most of it. Once the rain started, we moved inside and had some yummy cake!


This is what the everything looked like...

I bought the green storage bin to house boxes of crayons I collected from the guests, for Wedding decorations. The storage bin and shower curtain I used as a table cloth, adhere to Mel's bathroom theme. I also got all the guests to sign the shower curtain with sweet words and advice so that Mel can be reminded how much we love her the next time she takes a shower. 
The frame and the purple striped box, I made. 
I went to bulk barn and got candy to fill 4 jars as prizes. I also made sure to get enough candy to use for the party favours. 
I also bought a set of 3 pink shallow dividers to house the utensils at the party, which match Mel's bathroom colours. 
Here's a little more detail...
 First, I roughly cut a rectangular piece of material, using the frame as a guide. Then, cut 2 smaller pieces and placed them in a diagonal. I folded the seams twice over, then ironed them (mostly to avoid changing out the thread in my sewing machine... and I would have had to iron it anyway... that's my logic).
 Next, I placed the 3 pieces together again, laid the cardboard into the frame, and cut the edges of the fabric more closely (that's the pile of scraps you see).
 Voila!

 I put markers in this pretty desk organiser at the party, which we used for the games. 

 Next, I made a cute little box, which Mel says she will be using for mail...
 I took a box of tissues, wrapped it with a pretty bag I had, and hot glued it into place. I left the handle because I thought it was neat and possibly useful.

That was pretty much it! It was a small group, so I didn't need a whole lot. 

Thanks for stopping by! As always, I hope you can draw inspiration and make fun things for your next party!


{Daily Odd Compliment: You're the cutest thing since animals decided to stop growing and started jumping into teacups. Which, I know, is a pretty recently phenomenon, but it is so darn cute.}